Playing with old and sweaty grips can cause several problems while trying to play the sport we love. Knowing how to regrip a racket is actually a good skill to have as a tennis player. This is especially true when we are playing matches, and we only have a certain amount of time to do so.
While regripping a racket is relatively easy once you learn, it can be slightly difficult to maneuver the first few times as it requires some practice to get right. It’s somewhat of an awkward motion at first, but it gets easier with time.
So here is your step-by-step guide to regripping your tennis racket.
Table of Contents
Your Step-By-Step Guide
- The first thing you need to know is that you will be regripping what is referred to as the overgrip of a racket and not the original grip of the racket. The original grip of the racket is how the racket comes when first purchased. Leave this grip on.
This is because an original grip will be expensive to replace and also does not have the same tackiness or customization that an overgrip will provide a player. An overgrip will be much more affordable and is replaced as often as a player needs. This can be every few hours if the conditions are extremely humid, or this can be after a few weeks if it’s dry and the player doesn’t play as frequently.
- If you already have an overgrip on the racket, be sure to remove this. As mentioned above, to know if it is the overgrip, it will be a grip on top of the original grip that was sold with the racket. Likely, the original grip will be black.
- Now, you can take your overgrip and remove any plastic covering that the overgrip will have. All overgrips have this, and it is a thin layer of plastic wrap that goes directly over the overgrip to protect it from getting dirty before use. ALSO, the overgrip will come with a small piece of paper that likely has the brand’s name on it. KEEP THIS. It is the sticker to secure the grip.
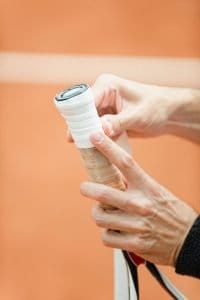
- Now, place the racket in your non-dominant hand. The racket should be upside down in your hand so that the loop or frame is at the bottom and your hand is placed on the handle midway through the racket.
- You will start with the end of the grip that has a small sticker placed on the inside. This sticker is also protecting a sticky end to the grip so that you can place this part directly on the handle of the racket and secure the beginning of the grip.
- Remove the sticker and place the thinner, sticky part of the grip on the end of the racket handle on one of the flat edges of the racket. The grip should move to the right while the racket handle turns to the left, so the end of the grip will go from left to right instead of right to left.
- Now that you have stuck on the sticky part with your right (dominant) hand, you will move your left hand up the racket and place your left thumb over the sticker part so that you can keep the last part you gripped in place.
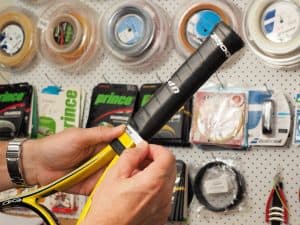
- Now, with your right hand, take the grip between your thumb and pointer finger while keeping your left thumb pressed down on the beginning of the grip. Now you will rotate the racket with your left hand, keeping your thumb down on the part of the grip that starts to fall onto the handle.
- Go slow because it is easier to correct errors this way. You will want to keep tight tension with your right hand on the grip as your press the grip down on the handle with your left thumb and hand. You will move the grip down slightly with each turn creating a diagonal slope so that the grip only overlaps slightly with the previous wrap around the racket.
- You will continue this pattern all the way till you have reached the top (or, in this case, the bottom) of the handle, and all the handle is covered. Do not go over into the throat of the racket, as this will be difficult to tape.
- If you have leftover grip, don’t worry, you can rip this part off with your teeth or some scissors. Make sure to keep that left hand still on the grip, so it doesn’t unravel. Now when it is secure, and there is no grip left, use the sticker piece of paper we had in the beginning and wrap it over the top of the racket to secure the grip.
This is how you grip a racket however, there are some things you should note to ensure you did it correctly.
Some Missteps Along The Way
- It is definitely possible to grip the racket too thin or too thick. How thin or thick you want to racket to feel will be up to you. When it is too thin, you will have not just a little of the grip leftover at the top but a lot. A too-thin grip will wear down fast and even possibly develop tears early on.
- A too thick grip will have not enough grip to cover the whole handle. A thick grip can be too hard for a player to grasp. If you want a thicker grip and even an overgrip is not enough for the player, they can simply just add an additional overgrip to the racket. Sometimes players do this for comfort reasons as well.
- Bumps and creases in the grip are no good. You want it to be flat and smooth. This is because when there is a bump or crease in the grip, eventually, your hand, while making contact with the ball, will provide friction in the opposite direction. This will pull the grip apart and can lead to a layer sliding down or up, exposing the inner grip. When the grip starts to move like this, it can begin to unravel and become uncomfortable or distracting.
What Are The Grip Handle Sizes and How Do I Choose?
Racket handles come in sizes 0-6 but most commonly 1-4 or 4 ¼, 4 ⅜, 4 ½, and 4 ⅝. The best way to really know is to play with a few different sizes first. When your hand gets tired easily from holding the handle, then this means the grip is too big. If it’s too small, you can always add another overgrip to make it a bit bigger if you already made the choice.
However, this is such a thing as the ruler test for those who have never held a racket before or don’t know where the best place to start is.
Step 1: Place all fingers tightly together like you are telling someone to stop.
Step 2: Place a ruler to the horizontal crease all the way up to the tip of your ring finger.
Step 3: This is the size that you should play with.
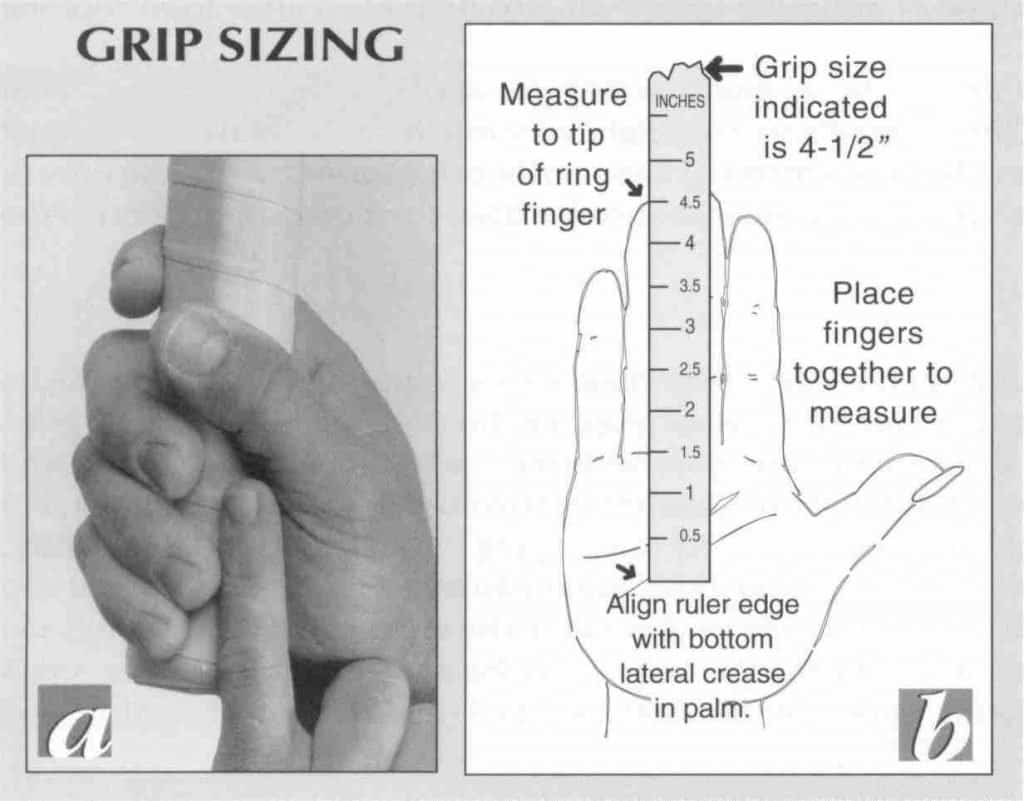
Or you can use the finger test. Hold the racket like you would for hitting a forehand. A finger from your opposite hand should be able to squeeze in and fit snuggly from the tips of your fingers on the racket to your palm.
What Are Some of the Best Overgrips on The Market?
There are so many grips to choose from that it can be overwhelming. Each grip has something a little different to offer for everyone, so consider some of these top grips to choose from.
Wilson Pro Overgrip:
The Wilson Pro Overgrip has been a fan favorite for both its tackiness and its comfort. They come in a multitude of colors like white, pink, green, yellow, orange, and more.
Tourna Grip:
Tourna Grip has been rated as the best overall grip from a variety of notable players like the Bryan Brothers and Eugenie Bouchard. This standout is a blue/purple grip that absorbs sweat and provides a durable feel for players at any level.
- Original length Tourna grip is recommended for one-handed backhands, junior racquets, smaller handles.
HEAD Super Comp Overgrip:
HEAD came out with its own grip called the HEAD Super Comp Overgrip. It comes in black, blue, and white. This grip has been geared towards more intermediate players because of its soft feel. This means that it will be slightly tacky but also have a focus on keeping the hands dry.
- HEAD PERFORMANCE: Born out of revolutionizing how we ski and play tennis, HEAD has constantly pushed athletic equipment into the modern era. With decades of experience in all racquet sports; HEAD offers nothing but the best tennis equipment on the market.
Yonex Super Grap Grip:
Many tennis players really struggle with the racket grip getting too wet over time. That’s why the Yonex Super Grap Grip is a perfect solution for those who need something a little more tacky than the Wilson Overgrip. This grip remains tacket and durable for long periods of play. For a three-pack, you can purchase it for $5.50.
Conclusion
Learning how to grip your own racket may seem overwhelming. There are many choices for grips, and it’s not the easiest thing to try and figure out on your own. Luckily, many local pros know how to grip your racket, and you can always ask them for a demonstration if need be. The best thing you can do for yourself is just practice.
There’s nothing that is more helpful than figuring out as you do it. Remember, you can adjust how thin or thick a grip is by pulling on the grip tighter or allowing more give as you go.
Now that you know how to do, try it out!